Showing posts with label Look What I Made. Show all posts

Tuesday, March 26, 2013

He Is Risen {Free Easter Printable}

I made this print for my mantle.  I made it huge – 11x14 – and completely love it. 

IMG_9195

I put it in a bright frame that I spray painted, along with some spray painted branches that I hung some easter eggs on.  It looks like Pinterest threw up above our fire place, but it makes me smile every time I see it!

I also make the print into a 5x7 and put them in lovely blue frames and gave them to the ladies that I visit teach! 

You can download the different sizes, I had originally planned on doing grey, so there is a grey 11x14 too!


He is Risen Pink 5x7

Pink 5x7 Here


He is Risen Pink

Pink 11x14 Here


He is Risen

Grey 11x14 Here


Hope you and enjoy!  And happy Easter!

Monday, January 7, 2013

Peppermint Playdough

IMG_9482
Hello friends!  How was you Christmas?  I hope it was wonderful!  I know ours was – wet, but wonderful. 
We spent it in Oregon visiting my husbands family.  It was so fun for our kids to be apart of their Christmas traditions.  Green eggs and ham for Christmas breakfast anyone?!  And who doesn’t love spending Christmas with Nana and Papa?! 
As always I am sad to see Christmas go.  So depressed in fact that Christmas has been half taken down at our house for a few days now. 
How was your first week of 2013?  (Well almost first week!)  Ours has been quite exciting!
So far in 2013 we . . .
IMG_0300
Went sledding!

IMG_0330
Made GIANT snowflakes.  We had sent some to Connecticut a few weeks ago, but just had to make some for ourselves too!

IMG_0332
Jaylie and I made cake pops with the Bakerella cake pop making toy that we got in the mail because I won a give away over at Munchkin Munchies!  Thanks Sue!  We loved it, and had so much fun!  I am in love with the little pink and blue bowls that it came with, and may have used one to make eggs for dinner tonight, just because it is so cute!

I also finished reading The Help, again, which I absolutely adore.  Fished a sock out of the toilet, which no one will admit to putting there (which leads us to believe it is the only person who can’t talks . . . ). 
IMG_0327
And started planning this cutie’s FIRST BIRTHDAY PARTY! 

I also tried my hardest to update our family blog, I am usually pretty good and was only a few weeks behind!  While I was looking through our pictures, I found these and was reminded of these cute little presents I sent to preschool with our oldest. 
IMG_9498
And yes, I said reminded, because I had totally forgotten about them.
I think my brain did it on purpose so that next time I think it is a good idea to make play dough for 17 kiddos and wait till the morning OF, and then run out of cream of tarter and have to frantically run to the only grocery store in our little podunk Idaho town, only to find it not open for another hour . . . and then have red hands for a week after because of all the red food dye. . . Whew I want to cry just thinking about it. 
But they were cute, and smelled delightful, and the kiddos were so excited (the parents maybe not so much . . . ).  So it was all worth it right?
I used this recipe from The Idea Room, but added red gel paste food coloring to it. 
I found that the little deli containers that they give you salads and stuff in where the cheapest route for packaging.  I got mine at Albertson’s for 10 cents a piece. 
Stuck it in a cellophane bag, added some tulle, and tags, and viola!
image
Here are some blank tags for you!
Blank Peppermint Playdough
Here’s to a crafty (tear free) 2013!

Monday, October 29, 2012

Fluttershy Halloween Costume {My Little Pony}

Hi friends!  It’s been awhile.  Lots has happened in life.  We’ve moved a bajillion times.  (Ok, like twice.)  I had a baby.  Who is now nine months old.  But here I am today, oh, and we’re getting ready to move again.  (Hopefully we’ll be done moving for awhile, especially since we are FINALLY buying our own home!) 
I wanted to share my daughter’s semi-homemade Halloween costume (I feel sort of like Sandra Lee now). 
She is totally obsessed with My Little Ponies, and just HAD to be Fluttershy for Halloween!

Fluttershy

Hoodie, found at the wonderful world of Walmart.  Added felt mane, wings, and ears.  Had a small logo on the front, which I unpick, which was a disaster, so we just covered it up with some felt butterflies. 
Skirt and legging we had on hand.  I just added a pink felt tail with a safety pin to the skirt.
I have been informed that Fluttershy still needs some hooves!  Other than that minor complaint, she totally loves it!

Thursday, February 17, 2011

Paint Stick Swords


Sword11

I am a double dipper.  Not in the gross George kind of way (you know George from Seinfeld?).  But I think, why reinvent the wheel?  I made these wonderfully awesome easy cheap swords and shields for kiddo family and friends for Christmas.  And I whipped them out again for Valentine’s Day, but of course gave them to different people. 

I also believe in taking things nice and slow.  So today I am showing how to make the Paint Stick Swords, and tomorrow I’ll show you how to make the Pizza Tray Shields.   


Sword1

Supplies for making your own Paint Stick Sword (in case the picture was not self explanatory enough):

  • JUMBO Paint Sticks.  I get my from Lowe’s.  They give me a few for free, but when I’ve asked for more than five they charge like 25 cents a pop.
  • Something to sand with.  I love me some power tools. 
  • Spray Paint.  I used primer first.  Splurged on some serious metallic paint. 
  • Electrical tape.  Not in the picture, but still very important. 
  • 2 Jumbo Popsicle Sticks per sword.  Also not pictured, but very important if you want to make a sword, not just  a shiny paint stick. 
  • Those Papa Murphy’s pizza baking trays are for next time, so ignore those for now. 

Got everything?  Ok we are ready to roll.


{Step One}

Sand paint sticks.  Round the corners off.  Get rid of all those pointy corners. 

Sword3

Sword2


{Step Two}

Spray paint a primer base coat.  Let dry.  Paint with your metallic paint.  Let dry.

Sword4 

{Step Three}

Attach pommel, I think this is the correct technical term, nope Googled it, it’s called a guard.  Use two Jumbo Popsicle Sticks for each sword.  Use a little bit of hot glue.  Glue one stick on the top and one on the bottom. 

Sword5


{Step Four}

Get your Electrical Tape.  Wrap  it all around the guard/hilt/pommel (I {heart} Google).  Give it a good couple layers.  Cover it all over. 

Sword6


{Step Five}

Have an awesome sword fight. 

Sword7

Sword9

Stayed tuned for the instructions on how to make the shield.  You simply cannot have a good sword fight without a sword.  “The most important piece of equipment is your shield! If you must make a choice between a sword and a shield, take the shield!”  (Name that movie!)

Tuesday, February 15, 2011

Valentines Crafts

Better late than never.  I strongly believe that ALL holidays should be at the end of the month, like Halloween.  I always need more time!


IMG_0619

Made these tissue paper hearts.  Found at Crafttown, via Gretchen at The Pike Family


IMG_0625

Handprint Owl , inspiration from Meet the Dubiens.  The Little Miss and I made this Valentine’s Day morning for Dad.  When he came home from work we showed it to him, and I asked, “Do ya’ get it?”  “Yeah.  ‘Owl’ love you.”  For a sec I thought, oh yeah, he gets it.  Then I realized it sounded not quite right.  It was really supposed to say “‘Owl’ ALWAYS love you.”  BIG oops!  Instead it’s more like, well, if I have to ‘Owl’ love you.  I tried.


IMG_0632   IMG_0636

Paper Heart Garland, found at The Pike Family.


IMG_0637

Plastic Bag Heart Wreath, found at Us and Them, via Tatertots and Jello


IMG_0697

Heart Tree, found at my house.  Tin bucket, on hand.  Branches spray painted white.  Red paper hearts, hole punched, hung with ribbon. 

Saturday, January 29, 2011

Glowing Snowmen

Cheap – Check

Supplies on hand – Check

Craft the kiddos can help with – Check

Fast – Check

Snowman 1a

Waaay back in October I made these ghosts out of empty milk jugs, and have been trying to think of a way to use the same idea again.  I came up with these little snowmen.  They were super simple to make, and make our porch so much cuter!


Snowman 3

{Supplies}

Empty milk jugs
Black and orange paper
Hot glue gun
Yarn
Fun Foam
Red paint
Paint brush
Knife
Scissors
Christmas lights


{To Make}

Once you’ve collected all the milk jugs that you want, make sure they are cleaned and dried really well, you’re ready to get started!

Cut out eyes and mouth pieces out of black cardstock. 

Cut out carrot nose from orange cardstock.  When I made the ghosts, I used a permanent marker to draw the faces on, you could do the same with black and orange markers, but I wanted the noses to stick out from their faces. 

Attach pieces on milk jugs using hot glue gun.  I tried my old friend Mr. Modge Podge, but it was a slippery mess!  Holt glue was soo much faster and easier, although I realize not the most kid friendly.

Snowman 4

I added some rosy cheeks with a tiny bit of red tole paint.  The paint was having a hard time sticking to the jug, so once it dried I sprayed it with a little bit of hair spray. 

You could stop here and your snowman would be perfectly fine.  But I was not going for fine, so I added some earmuffs.  Using yarn and some fun foam.  I made some pom poms out of yarn, cut a strip of fun foam.  Attached the yarn to the fun foam and then put the earmuffs on the snowman. 

To insert lights cut a flap in the back of the milk jug.  When I made my ghosts, I found the lights stayed in better if you cut a flap, not a whole.  So I went with a little back flap.

 Snowman 5

Stuff lights inside, arrange as desired, plug in lights and whal-la!

Snowman 6


I’m linking up to these parties this week!

Friday, January 28, 2011

Winter Wreath

Easiest thing I ever made.  Well, almost.
Bulb Wreath
Found some wintery ornaments after Christmas on super clearance.  Decided that since I had missed out making a Christmas ornament wreath, that I could still use these wintry colors to make a January/Winter Wreath!
Followed this tutorial from Eddie Ross.  Well, I thought I was following it, but missed a few steps.  Like bending your hanger into a circle before you pack on the ornaments.  And  I remembered the step about hot gluing the little metal part.  Mine were already kind of glued when I bought them so I thought it would be ok.  WRONG!  I had ornaments popping off all over the place when I tried to bend and reshape my hanger. 
So eventually I finished it.  But it still looked wonky so I messed with it some more.  More blubs fell off so I messed some more.   At one point I thought of just hiding it in an unpacked box downstairs, who would know.  I just didn’t want to ever have to see it again.  Eventually we (the wreath and I) made up.  I decided it would be ok.  Put it up on the shelf and was done with it.  I like it alright, but the more I look at it the more I see all these little/big things that just bug me. . . Bulb Wreath 2
Some other Winter décor:
Snowflake Frame
Stuffed snowman, my husband had this (and a matching Santa) when we got married.  I kid you not.  The frame was $3 on clearance from Michael’s, it had a Christmasy picture but I covered it up with a snowflake and some paper.  The mat came with it, isn’t it cute!

Wednesday, January 26, 2011

Frosty Letters

Frosty

Finally it’s finished!!  Hoorray!  What’s that you say, this looks like the easiest craft in the world.  Well, it was.  But it took me FOREVER to finish!  I am not good at working in phases/multi-tasking.  I like to sit down do a project, finish it, clean it up, the end.  I started this project and it probably sat on my kitchen counter in a half finished state for about a week.  But I bit the bullet and just got it done already!

I ordered several plain letter set from Wendy’s Etsy shop, Well Good, like right after Thanksgiving. 

image

I finished a few for Christmas gifts, but it really took me a loong time to finish my own!  I am happy with the way it turned out but so sad I didn’t finish it sooner so I could enjoy it longer! 

Monday, January 10, 2011

Ruffle Flower Purses Take 2 and 3

178_0846

178_0927

These were two Christmas gifts I made and gave to my cute little (who is now really the big 2-1 so I should call her younger, but I like to reminder her who’s boss!) and my favorite Sister-In-Law!  (Don’t tell the my other SIL’s, I don’t think they are aware of my secret crafty blogging identity, so hopefully they won’t read this!) 

I am getting to be a purse pro, well at least this style of purses.  I posted about my first purse I made for a friend’s B-Day, HERE.  Since I had a TON of leftover grey vinyl from that project, I decided these two purse loving gals would like one for Christmas.  (Oh, and I could still make ANOTHER purse!  I have that much leftover!) 

Two things that made process a little smoother the second (and third) time around:

  • I used a piece of fabric and a piece of vinyl for the strap, it turned out much better than my first attempt where I used two pieces of vinyl.  Sorry first attempt!
  • Second, I used two pieces of cotton fabric to make the pocket, instead of a piece of vinyl and a piece of cotton.  Again much better, and still super cute!!

I must give credit where credit is due, I was not clever enough to come up with this pattern on my own.  I found this great tutorial by Tam from Sew Dang Cute, who was guest posting on Ucreate.

I should add, my cute sister is the one in the bottom picture with the black and white purse!  She came down last Sunday and I told her I needed a picture of her purse for my blog.  I also told her I would crop her head out, but she’s just to cute to crop out! 

Tuesday, December 21, 2010

Reindeer Family

I am up to my elbows in wrapping paper.  I went out of the house with several pieces of tape stuck to my clothing.  I told Amanda in the toy section at Walmart that she was my hero for finding a toy I really needed wanted to get my daughter.  My Google Reader has spiraled out of control.  I don’t remember the last time my counter wasn’t covered in some sort of project.  I have gone through more hot glue gun sticks than I can count.  I’ve never sewed so much in my life.  I can’t believe Christmas has snuck on us so quickly.  I remember laughing at bloggers for posting/making Christmas stuff in October.  Lesson learned.  I promise I have some fun stuff to post, at least I think it’s fun, I hope you will too!  Just give me a sec ok? 


But here’s a quickie.  

Reindeer Family


I’ve seen these lots of different places. 

Made using paint HERE at Oopsey Daisy.

Using paper HERE at Homemaking Fun

Nothing original.  But we had lots of fun making our Reindeer Family together as a family.  Even the Hubby helped.  (Yes, my feet and hands really are that small, freakishly small!)


{Materials Used}

Cardstock (Light brown for antelers, dark brown for head, white and black for eyes, red for noses)

Ribbon (hanging and girl bows)

Raffia (for hair)

Glitter (for noses)

Wire (hard to see in the picture, but Daddy is wearing glasses)

Markers, scissors, glue


{To Make}

Trace foot for head.

Trace hands for antelers.

Cut out eyes, noses, antlers, heads, glue together. 

Add embellishments, bows for girls, glasses, hair.  I busted out the hot glue gun for the raffia, and ribbon.  178_0706

Mommy


178_0707

Baby


178_0708

Daddy

Tuesday, December 14, 2010

Ribbon Christmas Tree Shirt

In this household a new holiday means a new shirt for the Little Miss!  It only took me halfway to Christmas to make it!  But once I sat down and got started it went really fast, like two hours tops. 

This is what I came up with (and a matching bow, or course):
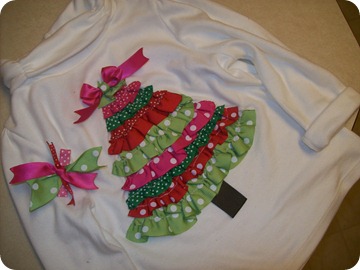
178_0600

It looks super cute on to, if you can get your model to hold still . . .

178_0599


{Materials}

Shirt (ours is a 3T)
Ribbon (I used about six different color/styles.  Some of the ribbon I had on hand by the spool, some I bought at Wal-Mart by the yard.  I didn’t use more than a yard of any, more like 1/2 a yard of most.)
Sewing machine (optional, would be just as easy to sew by hand.)
Needle and Thread
Pins
Heat n’ Bond or double sided fusible interfacing
Iron
Scissors


{To Make}

178_0574

To start I collected my ribbon and laid it out to get an idea of what would look best. 

I started with the bottom of the tree, cut an 18 inch piece of my ribbon. 

178_0575

Ruffled the ribbon using my sewing machine, set tension as high as it will go and stich length as long as it will go. 

Cut my next piece of ribbon about 1/2 an inch shorter, 17 1/2 inches.  Ruffled.  Cut the next piece 1/2 an inch shorter, 17 inches.  Ruffled.  Continue until you have cut and ruffled all your pieces.  I ended up with nine layers. 

178_0577

I laid my ribbon out once more on my shirt to make sure I had enough ribbon layers to make a tall enough tree.

Trace a triangle/tree onto paper side of Heat n’ Bond.  My triangle/tree had a six inch base and seven inch sides.

178_0578

Pin layers onto Heat n’ Bond.  Follow the instructions on the back of the Heat n’ Bond package.  Follow these very carefully.  Iron the back/paper side.  Do not remove paper side until you have cut out your shape.  Otherwise it will be a disaster and your shape template with be gone.  But if you do mess up, you are smart, just use your noggin you can figure it out!

178_0579

 178_0580

Remove pins, cut out tree, remove paper.  Pin tree onto shirt, iron tree onto shirt.  To be safe I turned the shirt over and ironed the back, instead of the front where the ribbon was.  Then turned it over and ironed the front, but placed a towel over the tree.  I was worried about the ribbon melting to my iron.  Irrational fear?  I say, better safe than sorry!

178_0581

Instead of sewing around the edges and across the layers with my sewing machine, I did some sewing by hand.  I didn’t want my ruffles to get all smooshed down.  I fanned out the sides of the tree a little so it didn’t look so much like a straight triangle.  I just put a small tack stitch in each ribbon then sewed across the ruffle about a 1/2 inch by hand. 

178_0583

Last step is to add a tree trunk.  I used a piece of brown ribbon, cut it about 3 inches, folded it in half, tucked the top unfolded edge up under the tree and hand sewed it down with tiny tiny stiches. 

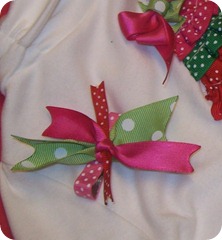
Last but not least I added a bow on top of the tree.  Just a simple four loop bow, like you would make for a girls hair bow. 

178_0601

This morning when we finished doing the Little Miss’ hair I decided that no bow we had would do, so I just HAD to make new one to match her cute new shirt!
178_0605


{Some tutorials that might help}

I kind of followed this tutorial where she made a ruffled candy corn shirt.

Making ruffles with your sewing machine.


I’m linking my festive shirt up to these holly jolly parties this week!

Plus a few more:

Krafty Kat
HollyBloggyButton1 Photobucket

Life in my PJs lil luna link   party button
Related Posts Plugin for WordPress, Blogger...